Monday, December 6, 2010

Trees for Christmas

This week the younger boys finally finished the Christmas trees that they started making back in late October, just in time so they could take with them for the Christmas holidays.

Oliver Gamboa (left) and Estiben Franco with their trees
All of the younger boys (age 7 to 12) made a tree in our normal woodshop classes.  Some of the older boys got interested and also made a tree for themselves.  And before it was all over, we had the older boys make about 25 new, improved versions to sell for the benefit of the ministry.

The project began back on October 23, when the younger boys started marking and cutting out the tree shapes from some 1/2" thick cedar boards that we had prepared.  They all learned how to use the scrolling saw for this project.

On previous versions of this project, we have used the scrolling saw to make the cutout for joining the two halves of the tree together.  But it is difficult to cut this rectangular shape with precision, especially for the kids.  Errors in the cut are also on display when the two halves are assembled.  So this year I decided to try to make the cutout using our nice dado stack on the table saw. 


Einer Posada making a cutout from the bottom of the tree half up with the table saw and our shop made jig

Both halves of the tree have a cutout - but in order to interlock, one is cut up from the bottom of the tree and the other is cut down from the top.  So we put together a jig, shown above, to steady and provide backing for the tree halves while making these cuts. 

We used the dado stack to make the cutout exactly 1/2" wide, so the tree halves have to be sanded in order to fit properly.

Friday, October 22, 2010

Mounting the drill press work light


When it is overcast or late in the afternoon, the boys and I have often felt the need for better light while using the drill press.  Now we have one; thank you, Lord!

I bought an inexpensive movable light downtown a few weeks ago.  The light itself and boom assembly are made from steel and look to be fairly sturdy, but the original mounting base was plastic and deformed easily if you repositioned the boom.  Plus, there wasn't anything convenient to clamp the base to on the drill press or the wall behind it.  So, it was time to make a sturdy mounting base for the light.

David Rocha, age 11, is only attending school two days a week these days, because the teacher has gotten fed-up with him.  Unfortunately, he has behaved badly in school this year and we have been unsuccessful in correcting his insubordination and rebellion.  So, for now, he is doing chores around the farm and doing homework on the days that he doesn't attend school.

David Rocha
I decided to have David help me make a new base for the light and install it.  He responded well to the one-on-one attention, particularly because he got to see and use a few power tools.  He's a very immature and often reckless kid, though, so I had to be careful to keep him out of trouble...

For example, the first thing he did upon walking into the wood shop room was walk over and turn on the lathe.  The lathe had a large, partially completely practice spindle chucked up.  That got my attention!  He had only seen the lathe with a sanding disc attached before - and had sanded a few things on it.  But he wasn't aware of the hazards of sticking your hands in the wrong places with a workpiece mounted up, etc.  After I told him not to turn on the equipment without permission, I showed him how it works and gave him the chance to make a cut with the roughing gouge.

We selected a couple of pieces of sapan (a South American hardwood, also known aromata or blackheart) to make the base.  Using the joiner, planer, and table saw, we trued them up and cut them down to size.  I had a bit of a panic when the planer nicked a couple of small nails that had been buried in the 4x4 piece (it was part of some used posts from a porch that had been donated), but upon checking the cutting blades, we found no damage.  David loved the action and noise of the big machines, feeding the planer and receiving boards that I fed through the joiner and table saw.

After the mounting plate and block were cut out, I decided to dress them up using a chamfer bit with the router.  So we set up the simple router table and cut small chamfers on the plate and larger ones on the block.  David hadn't seen the router before and was amazed at how nice of results it produced with very little effort.

Then we sanded the components and drilled holes for mounting and assembly.  We experimented on some scrap wood to determine the best size hole for inserting the spud from the boom assembly so that it would turn in the hole, but not be too loose to hold its position.  I did all the marking, David did all the drilling.  We clamped everything down because sapan is a rather hard wood and requires lots of force to cut it.

We used glue and four big wood screws to secure the block to the mounting plate.  

Finally, it was time to mount the whole thing on the wall. I thought we might spend and hour on the project, but it took more like two.  David had to leave to do some homework, so I drilled the holes in the wall and mounted it next to the drill press.  David posed later for the picture of the finished project.  We both felt like we had accomplished something useful and fun.

Wednesday, October 20, 2010

Building a second floor


We need a better way to store the spare beds and drawers that have been camped out in the workshop for quite a while now, so we got busy making a temporary wooden floor to provide the needed space.

A group of boys including Arley and David Rocha, Alex and Anderson Mora, and Fabian Perdomo,  were thrilled with the idea of building something that involved nails and hammers and saws.

So we leveled up some fence posts as support beams and got busy nailing down some spare 1x8 lumber to form the floor.  We ran out of the 1x8s, so used some 2x4s to finish up.  All the lumber was eucalyptus, so after a half-dozen successive bent nails, I suggested they get the drill to pre-drill the holes.  That helped, but they still managed to bend a few more nails...

 Here are some pictures of the work in progress. 


Once the floor was finished, then we hoisted up the packages of bed parts that we had banded together.  In the days prior, we had repaired and organized the parts into complete sets.  For the heavier packages, we used a rope through a block attached to the roof beams.  Of course, once the work was done, that particular apparatus became a whole new source of interest and activity.  Fortunately, no one was injured in the ascents and descents.


Here is a picture of the finished project - the new floor in place (above the bicycle parts cabinet) with the spare beds stacked up on top.

Tuesday, October 12, 2010

New life for an old filing cabinet

Often, those back-burner projects just never seem to get done.  Case in point, we've had a filing cabinet in the shop for at least two years now, waiting to be painted and fixed up.  There always seems to be something else more important to work on...

But I finally assigned the project to John Egson Fonseca back in March.  He started removing the rust and paint with a wire wheel on the hand grinder, but after several aftnoons, he tired of the work and the project lost momentum. 

So, the file cabinet has been sitting around in the shop for months now.  Here's a picture of John painting a door latch (hanging on a wire) , with the cabinet half-done in the background...


So, I decided to get this project moving again a couple of weeks ago.  I asked another of the older boys, Einer Posada, to help John get this cabinet painted.  The carrot was that they would learn how to use the spray gun.  Actually, John has had some experience with using the gun, but Einer had none.  So, we removed the drawer slides and other bits and pieces and.they got busy sandblasting the interior of the cabinet.   

They thought they were done at several points, but then we'd look again and find some other nook or cranny that had some nasty rust hiding out.  The process was a bit trying, but like I told them, if we don't do a good job of preparing, applying the paint won't matter.  The rust will pop out again and ruin the whole project.


We found during this process that the steel would actually rust overnight when it was bare.  So, after a hard morning's work removing new rust, it was finally time to let the paint fly.

I had carefully explained beforehand how to operate the controls on the spray gun, how far away to keep the gun from the piece, etc., but in the end, they had to learn it all by doing.  It's too much instruction to take in well without a little practice.

Einer and John took turns applying paint. I decided to spray the inside of the cabinet, because of the difficulty, and because we were short of time.


By the end of the quart of paint, the cabinet was looking much better.  They had the predictable problems of runs here and there, but really it turned out well.  And since it was just a primer coat, all the little errors can be rectified while sanding for the next coat of paint.

The boys were exhilarated by using the gun and figuring out how to control it.  I enjoyed seeing them experiment and make corrections.  They weren't so excited about cleaning up the gun afterward, but that's just the way painting is....lots of preparation, a little painting, and lots of work cleaning up.

So, the filing cabinet is now one step closer to getting out the door of the shop!  Stay tuned for the next installment...who knows when....

Friday, October 1, 2010

Making Egrets from PVC Pipe

This week, the boys and I got busy and made 10 white egret figures to be sold at a fund-raising concert for the benefit of the IMC ministry.

We've known for quite a while how to make these figures, but just hadn't just hadn't put the pedal to the metal until now.  The man that taught us how to make these beautiful figures of a white egret cut from PVC pipe was Henry Van Barneveld from Canada.  Henry makes them every now and then to sell at craft fairs.  They really are attractive and fairly simple to make. 

The 2008 Canadian team, l to r, Stu, Scott, Jack, and Henry
Henry, and three other members of Zurich Mennonite Church in Ontario, Canada, came to Granja Peniel in September 2008, where they worked for more than a week making many improvements to the workshop.   Thanks, again, Henry, and the rest of the team, for all your help and support - it is still paying dividends!


Fabian Perdomo cutting, Anderson Mora and David Rocha holding the pipe.
 The first step in making the birds is to mark out the shape on a 3-foot long piece of 4" PVC pipe, using a pattern.  Henry left us two patterns to use, one large size and one smaller one.  Then we cut out the shape using a jigsaw.  Sounds easy enough, but if your technique is poor, the plastic just vibrates and won't cut...

Then the boys drill holes for the eyes and mounting screws.

And apply some heat to bend the plastic into a shape more representative of the bird...

Finally, glue on the eyes with some hot silicone...

Duvan Guayara drilling the hole for the rebar spud
And cut some short logs to mount the birds on, attaching three wraps of white rope near the top and a rebar spud to stick into the ground....

And you're ready to send them off to market.  Actually, the marketing here is the hard part...so far we only sold two of the birds, even with a rather low price of $20,000 pesos (about $11 US).  Apparently, Colombians haven't yet arrived at the point of appreciating yard ornaments?

But the boys and I had some fun making them, and they are strikingly beautiful.  Perhaps it will just take a while before they catch on, let's hope!

Friday, May 28, 2010

Refinishing the rocking chair

Several years ago, we received a donated rocking chair that was in need of repair. It has been sitting around the shop since, and only on a couple of occasions have we done some work to fix it up. First we repaired a broken arm, and then another time we began replace the wicker seat and back with slats from a broken baby crib.

On May 24, I asked Ruben Ruiz if he'd like to finish fixing the chair. He said yes! Ruben had come to Granja Peniel that day with me since it was a holiday and I was also bringing out a couple of students from El Camino to serve their social service hours. Ruben is a son of Nancy Ruiz, a woman whose family we have helped for many years, and he loves to go to the farm and work and learn.

So I showed him how to apply putty to the holes left from the wicker seat and back. He puttied up the holes and then sanded most of the chair. The power was off, so all the sanding was by hand.

Then I helped him cut and attach the slats to the seat and back of the chair. Here is a picture of Ruben attaching the last of the slats:


Then of course he had to try it out:


Next time, he'll finish sanding the chair and apply some finish - then we can get it out of the shop and give it to Aminta (one of the care-giving couples at the farm).

Younger boys - car fever

Last year, the younger boys (age 5-10) were making wooden cars similar to the evangelical cars that the older boys made to take to Haiti.

But other priorities came up - so I put those partially completed cars away in a box for another day.

Since our return from the Haiti trip on May 4th, I've been working with the younger boys again to help them finish their cars.

We have three boys who are new to the farm this year - and therefore didn't start on the project last year. So they have started from scratch, cutting out the body on the scrolling saw. The newest boy, Alberto, was afraid of the saw initially. I told him that God has given him a great gift - that of being careful, and that this gift will serve him well in his life. To get started, I guided his hands feeding the piece on the work table of the saw. When he got used to the noise, even though we were wearing ear muffs, he did fine and was nearly on his own by the time he finished cutting out the shape.

Most of the other boys have been sanding their car body using sanding drums on the drill press. Their next step is cutting out the wheels.

Four of the boys, Andres and Johan Jimenez, Kevin Rocha, and William Cruz, cut out their wheels last week and finished assembling their cars this week. They now only have to dip them in preservative to finish the project.

I'll add some pictures next week to show you the boys and their cars.

Thursday, May 27, 2010

Evangelical Cars Delivered

My youngest son, Keegan, and I carried the evangelical cars with us on our trip to Haiti in late April.


Here is a Keegan (sitting on the wall) with the other members of our work team as we were leaving the international airport in Port au Prince.

Had it not been for the Lord's grace, who saved me from losing my suitcase at the airport, half of the cars wouldn't have made it.  The man he used to help me hang onto my suitcase was Nadir Elioner, who is pictured driving his bus, below:


Nadir is a Haitian Christian who speaks English and who shuttled us in his bus from the international terminal to the terminal for in-country flights.  He witnesses to everyone and has quite the personality.  Based on our experiences in Colombia, I was very worried about keeping track of our luggage during this transfer, because Nadir's helpers had hoisted all our bags onto the roof of the bus for the trip.  I would have preferred to have it in my hands.  After I got my bag back upon arriving at the second terminal, I hauled it inside, and put it on the belt at the security checkpoint.  Somehow, after passing the usual screening rountine, I forgot the bag on the belt coming from the x-ray machine and walked on into the terminal.  Everyone else was ahead of me, and they put all their bags together while we waited in line to check-in.  Maybe 10 minutes later, Nadir came up to me and asked if I'd left my bag behind, because he saw it on the end of the belt.  Talk about feeling foolish, I did, but I went back and retrieved my bag.  Evidence that God is gracious to idiots, too!

We were in Haiti to help put the roof on a rural church in northwest Haiti.  We decided to deliver the evangelical cars to the leadership of this church, to support their position of authority and leadership, rather than play the role of gringo Santa Clause.  The pastor was delighted and said he planned to give some of the cars (and some small balls we brought along) to the children of the congregation, and also use them as gifts in a evangelical campaign they are planning.

Here is a photo of me delivering the evangelical cars and other goodies to the pastors.  Left to right, Pastor Sito's wife (sorry, I can't remember her name), me, Pastor Sito, and Pastor Willy.


The church runs a private school and has a small vocational training program teaching young women how to sew tablecloths, etc.  They have a big vision for their church, including starting an orphanage for kids who have been abandoned by their families.

If you would like to see all the pictures of our trip to Haiti, just click on the following link:

Haiti Trip May 2010

Monday, May 10, 2010

Stamping and Dunking the cars for Haiti

We were getting down to a matter of days before our trip to Haiti, so there was no more time to wait.

These cars need to be stamped with a Bible verse (in Haitian Creole) and a protective finish applied to get them ready to make the trip.

With the help of our work team leader, Tom Veneman, who knows Creole and has lived and worked in Haiti as a missionary, I selected a portion of 1 John 4:16 (God is love) as the verse to stamp on the cars.

I got the rubber stamp with the verse and the IMC logo made in Bogota and then we were ready to start the presses rolling.  Well, not really, we just used a stamp pad.  On April 19th, the cars got stamped.

Once the ink was dry, then I dunked the entire car in a wood preservative that doesn't contain any heavy metals, in case kids start chewing on the cars some day.  The next day, after they had dried, they got dunked again. 


The cars on the far table have been stamped but not dunked.  The cars on the near table are darker because they are saturated with the wood preservative.


I was thankful for the work of all the kids in getting these cars ready on time for our trip, which started on April 23.


The 50 cars ready for packing and shipment.

Assembling the last of the evangelical cars for Haiti

John Egson Fonseca and Camilo Castro got busy on April 12 and were able to finish assembling the last of the 50 cars for the kids in Haiti.  They cut out and sanded about 20 wheels, cut the dowel material to length for the axles, and put the remaining 25 cars together.  They did a good job, too!


Camilo (left) cutting the axles and John Egson (right) assembling the cars.

Sunday, April 11, 2010

More wheels - for evangelical cars and mountain bikes

On Saturday, several more of the boys at the farm got their turn to make wheels for the cars for Haiti.  Neither Alex Mora or Fabian Perdomo had chucked up a bit in the drill press before, so I should have started with a more in-depth training before they started the project.  After one of them let the hole saw fall onto the shop floor while removing it from the chuck, I finally realized it was time for more remedial instructions.

That covered, they did their best to align the hole saw cuts from both sides of the workpiece, but about a third of the wheels were coming out uneven across the "tread" area.  So my son, Keegan suggested that we just cut them from one side - which doesn't produce as clean a cut (ie. more tear-out), but at least the tread area is even straight across the wheel.  In practice this change lead to better looking wheels, because the sanding required for the significant tear-out was easier and faster than that required to rectify the uneven tread.

So the boys cut 10 wheels apiece and sanded them off.  That left about 60 wheels to go to meet our goal of assembling 50 cars.

Fabian with his 10 completed wheels.


Alex Mora with the product of his efforts.

Then Keegan and Arley Rocha worked together and cut out another 40 wheels between them.  They also cut up all the axles for the rest of the cars.  So at the end of the day, we're only lacking another 20 wheels before we can assemble the rest of the cars.

I've been looking for linseed oil here, which is the material specified to finish the cars in the instructions for these cars that I received from the folks in Coeur d'Alene, Idaho, who gave me the idea for these cars.  Here in Colombia linseed oil would be called "aceite de linaza", but so far no joy in finding a source.  At the wood-working stores and paint stores that I've checked so far, they all look at me like I'm a crazy gringo when I ask if they sell the oil here.  I read on Wikipedia that linseed oil doesn't prevent mildew, so perhaps that is why it's not popular in this humid climate.  So I've bought some Tung oil and some clear wood preservative to test as potential alternative finishes.

Aside from the work on the car parts, Einer continued stringing up the spokes on the new wheels for his bicycle.  He did the front wheel about a week ago, and on Saturday had the chance to work on the back wheel.  Only problem was getting the gear cassette off the hub.  Since the cassette was so firmly attached (rusted on), we had trouble with the hub slipping in the vice while reefing on the freewheel remover.  In the end, the hub was damaged because of the high force we put on it to keep it from turning with the cassette, so I gave Einer a new one to replace it.  Then he could finally remove the old spokes and start installing the spokes, as shown in the photo below:

Einer stringing the spokes while Arley helps steady the wheel.

Other misc tasks we completed during the day were repair of the firewood storage rack by Arley and another coat of epoxy paint applied to the chemical pump support by me. 

Not a day of big wins, rather of determination to keep moving ahead.

Thursday, April 8, 2010

Cutting big wheels for the dragster cars

On April 7th, Anderson Mora cut out 28 two-inch diameter wheels for the dragster version of the wooden cars we are preparing to take with us on a two-week work team trip to Haiti.

 Anderson holding the remnant of the scrap hardwood board he used to cut out the wheels, shown in the foreground..


Anderson is only 11-years old, but he did a very careful and precise job making the wheels.  At the moment, he is the most eager student in the workshop at Granja Peniel.  He is anxious to learn and is happy getting experience in the workshop.


During the two hours he was working, Anderson learned how to use the hole saw on the drill press.  We found that it works best to first cut all the holes about 2/3 of the depth of the board (enough that the pilot bit goes all the way through), then make a pass with the spade bit to form the "hubcap", and finally turn the board over and finish cutting the wheel using the hole saw.  Alignment using the pilot bit hole on the last cut is particularly critical to the wheel being true.

After cutting all the wheels out, Anderson spent a half an hour trueing them up using the disk sander attachment on the lathe:


We still lack cutting out 80 of the smaller wheels to equip the full fleet of 50 cars that we plan to take to Haiti.  The boards are prepared and sanded.  Next week, Lord willing...

Evangelistic Cars for Haiti

Last week, during the school break for Semana Santa, we started making 50 wooden cars that my son, Keegan, and I plan to take to Haiti later in April. We plan to give the cars as evangelical gifts to kids that we meet there.  Each car will have a Bible verse printed on it.

Starting March 29th, the group of five young men cut out the bodies for all the cars and assembled about half of them. We hit some obstacles along the way. But with patience and God's grace, we found ways around them.


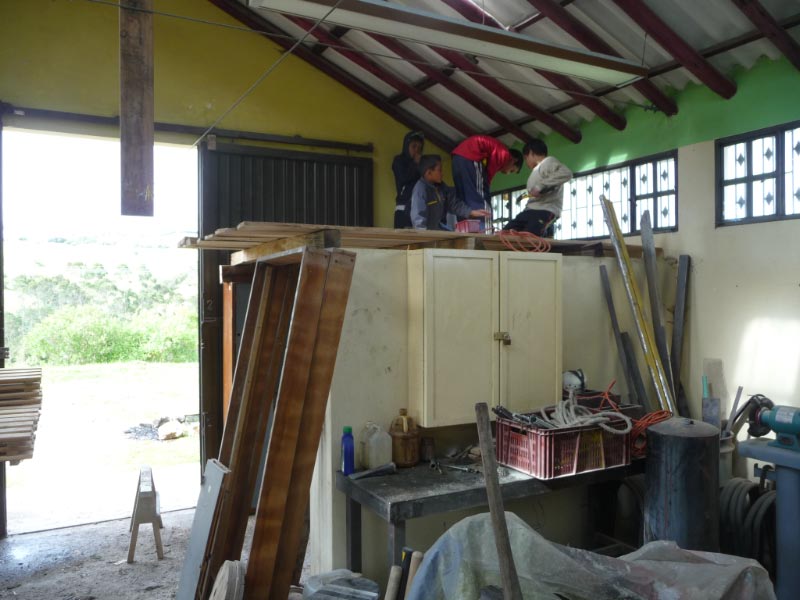
The picture below shows the crew that worked on the cars, l to r, Ruben Ruiz, Einer Posada, Keegan Bye, Luis Meza, and William Gomez.  They are seated on a few of the eucalyptus blocks that we unloaded from a big truck on Day 2 of the trip.


The first problem came up right after we'd prepared the wood to cut up into car bodies, when we discovered that the scrolling saw had a problem. It made a terrible racket when we turned it on, similar to the noise it makes when you break a blade. But the blade was new and properly adjusted. After disassembling the machine (with no instruction manual or previous experience) we found out that an internal spring was broken. Fortunately it wasn't hard to bend a new end attachment on the spring, but it took three tries to get the machine re-assembled correctly and working properly. We probably spent half of the first day fixing the scrolling saw, but without it we wouldn't have finished any cars this trip, we'd still be cutting out car bodies...


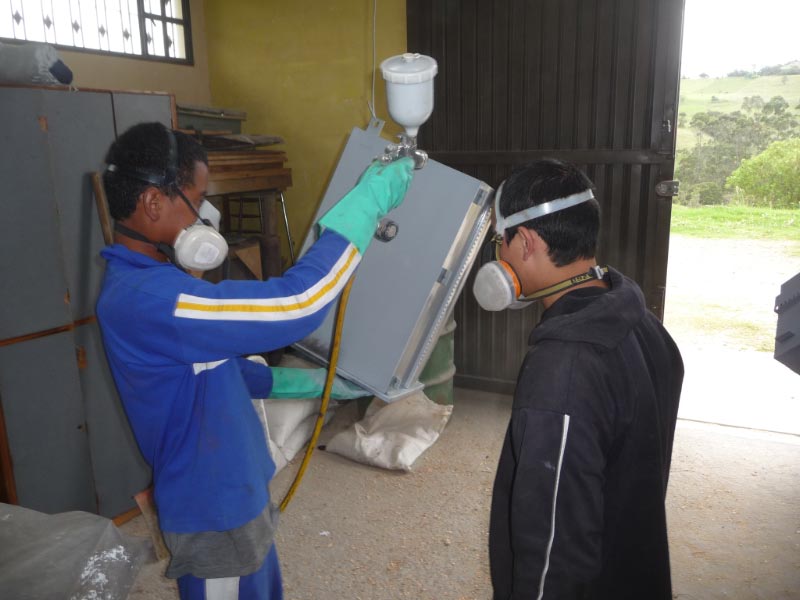
So, Einer Posada and William Gomez took over the scrolling saw and made the sawdust fly! Einer is shown in the picture above, here he's running the cars over a 1/8" roundover bit in the router, but the scrolling saw is shown in the background.

Meanwhile, Keegan and Luis Meza smoothed the bodies with a sanding drum mounted in the drill press and drilled the holes for axles and simulated windows. They made a whole lot more sawdust fly! In the process, we encountered our second problem - the drill bit for the axle holes was dull. So I got the Drill Doctor out and sharpened that bit and many more that were dull in the set. Sure is a blessing to have nice tools!

Einer (nearer) and Ruben (operating press) drilling holes for axles.


Luis and Ruben Ruiz cut the 8mm dowels to the appropriate length, using a Japanese back-saw and a homemade miter box. They quickly cut up all the dowels that we had, which was enough for about 25 cars.


Then we set up the router and roundover bit so that Einer could run them all through, rounding off the sharp edges on the car bodies. Quick - and saves a lot of sanding to make them look so much more finished!

We saved one of the harder and more time-consuming jobs until Day 2, which was cutting out the wheels from 3/4" hardwood. Keegan was the specialist at this job, while Luis sanded off the tearout using the disk sander. It takes 200 wheels to make 50 cars!

Then there is the hand sanding and assembly step. Not as easy as it sounds, because you often have to take it back to a previous step to correct defects. William Gomez and I are the fussy detail-oriented types on the team, so we did most of this job. Hard work!

At lunchtime on March 31st, they had cut out and assembled 25 cars, with another 25 car bodies waiting for wheels, axles, and assembly. We needed more materials and our support staff was itching to get back home, so we called it good for this trip.

Monday, April 5, 2010

Welcome to this blog

This workshop has been operating since 2005 but this is our first attempt at communicating what we are doing to a wider audience.  We have been greatly blessed to have this workshop and many wonderful tools to help the boys discover what they can do with their hands and minds.  We hope that you'll enjoy seeing what they are up to!