Wednesday, August 31, 2011

Painting the BBQ

You may remember that we built a barbecue for the ministry back in mid-May.  We didn't have time to paint it before I left on my trip to the US, so now we're finally getting around to the effort.

The barbecue before painting.

The prep work for this project included finding high temperature paint for the job.  Many paint stores that I tried in Bogotá carry aerosol cans of this paint, but it is rather expensive in this form, about $12 per can.  So I dedicated most of a morning to go find high temp paint in bulk, and when I found it, bought a quart plus the special solvent for about $15.  Now I'll know where to go when and if we get around to building those wood stoves that I've been talking about for years....

The next piece of preparatory work involved removing the considerable amount of rust, scale, and grease that has built up on the barbecue over the past couple of months.  The boys started on this job using one of the 4-1/2" grinders fitted with a wire wheel, but we quickly found out that this was a job too risky for them to handle.  Camilo Castro, one of the older and stronger boys, hit an edge wrong with the grinder, such that he lost control of the grinder and it ended up stalled with the wire wheel wound up in his sweatshirt.  Fortunately, he wasn't hurt and I was able to disconnect the cord fairly quickly.  I thought the grinder had toasted the motor when it was stalled with the power still on, but after having it checked out at the local dealer, it was deemed still have another life left in it.

So the boys used wire brushes, putty knives, compressed air, and solvent to clean up the body and legs of the barbecue.  Then I finished the job using the grinder and wire wheel, but with care, and without incident.

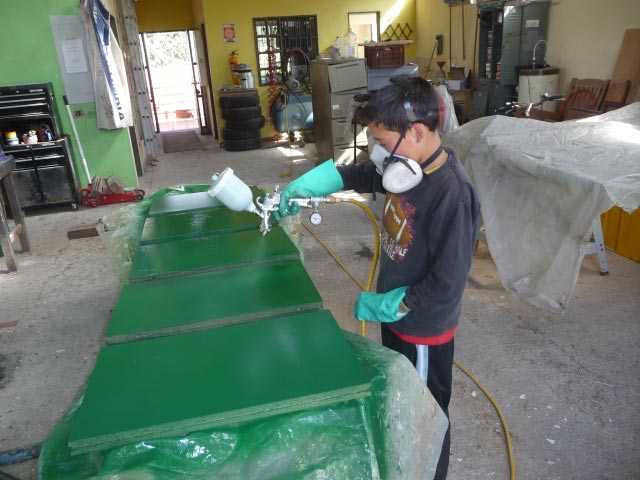
After an afternoon of preparation, it was time to paint.  I sprayed the first coat because the boys were all busy with other duties that day.

The barbecue after the first coat of paint.
The high temperature paint requires an unusually long period of time between coats - 10 hours drying time.  So the next day, Andres Castro applied the second coat of paint:

Andres hadn't used the gun much before this job, so he learned a good deal about how to adjust the gun for each situation, and improved his technique dramatically.


We suspended the unit on some lengths of small angle iron for painting the underside, which meant Andres had to stand on a bench to reach the bottom of the supports.


Andres ended up with a few wrinkles and runs - but for his level of experience with the gun, he did very well.

Here's the proof, the finished BBQ, now situated in its own covered spot below the park structure at Granja Peniel, ready for the next time we need to grill some steaks....


Friday, August 12, 2011

Making signs around the farm

Here's a sign the staff put together one afternoon with bottle caps, marking the start of an environmental trail winding through the pasture lands at Granja Peniel
As a money-raising activity, the ministry has recently begun offering Granja Peniel as a field trip destination to schools in Bogota.  To help make their visits more educational, we needed some signs around the farm explaining the names of the various animals and facilities we have.

So, we found some scrap particle board sheets in the workshop that would fill the need for the time being, and cut them into practical sizes for signs.

Then the boys got busy painting...Anderson Mora and Arley Rocha got the nod.

We decided a nice green background would look nice, it was the best color of paint we had on hand, too.

Arley Rocha giving the new signs a nice coat of paint

Anderson Mora applying a second coat.
 Most of the particle board had came from office dividers and furniture - and was equipped with plastic edge trim.  Thinking that this trim may help extend the life of the signs out in the rain, I found some more trim (cheap) in Bogota.  After the signs were painted,  we installed old or new trim on all the signs.

 Then we turned the signs over to Alejandra and Angie Guzman for the hard work - that is lettering!  They have the artist's touch and made the plain painted wood into functional signs.  I don't have photos of their efforts, but here are some shots of how the finished signs look.

Here's the sign on the greenhouse - huerta means garden in Spanish
And the sign on the rabbit shed
And a sign listing the different breeds of the cows at the corral
And last, but not least, the sign at the sheds where the goats spend their nights.
We do plan to make more permanent signs one day soon, probably gluing up some pine lumber that we have on hand - and using a router to make at least some of the lettering.  But the signs above that we put together in less than a week will do the job nicely in the meantime...