Friday, November 25, 2011

Products for the ministry fair

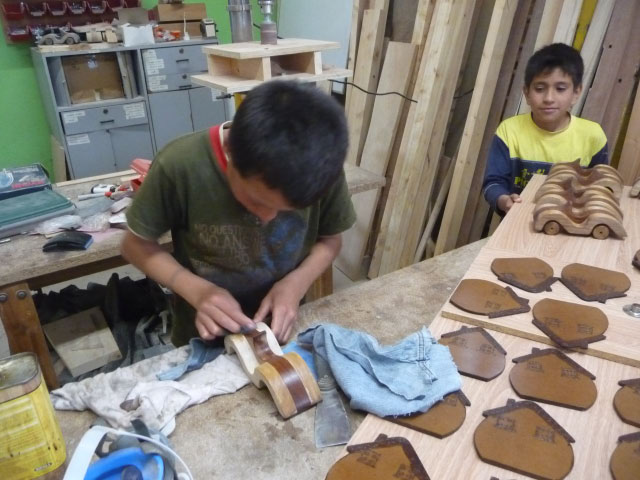
Armed with two new drill presses, we got busy in November producing products to sell at the ministry fair on November 28th.  For the fair, we decided to make some nice wooden cars from hardwood, finish up some Christmas trees that we started last year, and mostly focus on producing cute house-shaped plaques.


Below is a shot of the finished Christmas trees and nearly finished cars and plaques.


If you'd like to see more of the process of the kids making these products, continue scrolling down.

Wooden Cars

William Gomez (left) and Kevin Garcia sanding components for wooden cars

Sebastian Arce cutting out wheels for the cars

Kevin Garcia clamping the car body components together

Yordan Muñoz gluing up the car bodies

William Cruz (left) and Anderson Mora assembling car bodies


Anderson Mora sanding a hardwood wheel on the lathe

What a difference the finish makes!  

We applied 3 coats of tung oil to bring out the natural beauty of the oak and sapan hardwoods used  to make the cars

William Cruz applying the finish

House Plaques

The plaques are cut out from a sheet of 3mm thick medium density fiberboard (MDF) using the scrolling saw.  Then the exterior shape is sanded and the tile roof texture and window frames are added using a wood burning pen fitted with various tips.  Somehow I managed not to capture these steps in the photos....

Then Anderson Mora applied stain to the area of the simulated roof tile

Jerson Espinosa blowing off dust before we applied another coat of sanding sealer


House plaques after applying a coat of tinted lacquer

Sebastian Arce drilling pilot holes while Kevin Garcia (left) and Arley Rocha (right) install hooks for keys

Christmas Trees

Johan Fonseca cutting slots in the tree shapes using a dado stack on the table saw

Jerson Espinosa showing the tree shape now mounted on a round base

We then burned an emblem onto the tree shape which we colored before  applying sanding sealer and clear lacquer


Friday, November 18, 2011

Refinishing school desktops

You know how sometimes projects come out of left field, just at the most inopportune moments?

Well, that's how it was with this project.  Nearing the end of the school year, the teachers at our neighborhood school, where the kids from the farm attend up through grade 5, asked if we could refinish the desktops for 30 or so of the desks at the school.  They are accountable for the desks - and were concerned that they were in poor shape.  They offered that the parents would pay for the work.

So, in an effort to help out the school and teachers that educate the boys at the farm, we undertook the job on November 17th.  Before school, the kids removed the desktops and in the afternoon, they spent hours sanding them down.  That same day, we applied a coat of sanding sealer.

The next day, we began applying the lacquer top coats.

Felix Pinson preparing to apply the tinted lacquer.  This was his first time with the spray gun.

The tinted lacquer is unforgiving - because it leaves uneven color if the spray is applied unevenly.  We had some of those problems.

To even out the color, we applied another couple of coats, so the desktops ended up  rather dark.  We would have been happier with two coats evenly applied, but live and learn....

We did get the desktops finished in two days of work, so the interference with our main priority of preparing products for the ministry fair was not much delayed, and the teachers were appreciative for the help.

Thursday, November 3, 2011

New shelves for the IMC office

In early September, we were asked to make three, big (60 cm x 93 cm) shelves for the ministry office.  Knowing that I would be away travelling for the first half of October, I responded that we could - but not until the end of October.

A couple of the older boys helped rip up two blocks of fir (called pino cipress here) into 4 cm thick slabs during September so that it could dry by the time I returned from my trip.  Unfortunately, I don't have any pictures of this process.

After my return, we planed the slabs down to 3 cm thickness and trimmed them up to make them into finished lumber.  After that, we formed the tongue and groove pattern on the edges using multiple passes with a rabbit bit and then a slot cutter on our provisional router table.

The shop-made tongue and groove pine lumber.
Our provisional router table, which consists of a piece of 1/2" particle board clamped to an set of table legs from an old table saw, supporting a 2.2 Hp Milwaukee router.  It works, but leaves a lot to be desired, so in December I began making a REAL router table - which you can read about in a later post...
We then glued up the shelves and after they dried, the boys began sanding them flat.

The shelves now glued and clamped together.
We then trimmed the shelves to finished size and beveled the upper surface of the front side of each shelf using the hand-held router.  Sorry, no pictures of this step....


Andres Castro using the belt sander while Arley Rocha observes.

Camilo Castro trying his hand with the Dewalt belt sander, which can be a challenge to control, especially on the far side of the shelf.

Arley Rocha taking his turn sanding.
The boys spent a good bit of two afternoons sanding, it was surprising how long it took to sand both sides of the three shelves, going down t through the various grit sizes to 120 grit with the belt sander and then to 320 grit with an orbital sander.

Preparing to hang the shelves for painting


Finally, it was time to begin applying finish.  We applied three coats of sanding sealer and then two coats of tinted lacquer to make a nice, smooth finish.  Of course, we sanded the surfaces again lightly between coats.

William Gomez applying sanding sealer to the shelves.

The shelves before the tinted lacquer was applied.


We completed the shelves on November 3rd, a few days later than promised, but they turned out very nice.


The completed shelves as installed at the IMC office

Nancy Centeno, the IMC Director in Colombia, liked the shelves so much that she has asked us to make three more for her office...

Wednesday, October 26, 2011

Fixing the Ping-Pong table

Back in September, we began working to refurbish the ping-pong table, which had suffered some abuse and needed some minor repairs.

The main damage to the table was that the flat bar knee braces on the legs were terribly bent up and really weren't strong enough for the job.  So, we bought some small (3/4" x 3/4") angle and made new knee braces.

Anderson Mora cut the angle to length and here is rounding off the corners with a small grinder.

Anderson drilling holes in each end of the new knee braces.

Johan Egson Fonseca painting the new braces.

In addition to making the new braces, we added hardwood reinforcements under the table top where the particle board had cracked.

We didn't actually put everything together until after I returned from England in late October.

Here are a couple shots of the renovated ping pong table before it left the shop:


Wednesday, October 19, 2011

Apology for gap in posting

For those who have been looking for something new on this blog between the end of Sept 2011 and now, Feb 26, 2012, you have been disappointed.

For that lapse in postings, I do sincerely apologize.

My wife and I were blessed to visit ministry friends in southern England during the first half of October, and I just didn't get caught back up until the end of the year.  We had a very busy time in the workshop in late October and November, so I didn't find the time to explain to you all what we were doing.  Then I made an trip to the US during the month January to visit my  family, prompted by the illness and death of my younger sister.

Now that I am back and into the swing of things, I hope and expect to go back and resurrect the postings that should have been made in October through December last year, as well as capture what we have been doing at the workshop this month.

Here goes....

Wednesday, September 14, 2011

Fixing the front door - older boy's house

Due to settling during the last rainy season, the front door to the older boy's house got very tight in the frame, to the point that it only closed with great force or by slamming it.  I thought for a few months that the house foundation would eventually return to its former position, and that the problem would abate, but that proved not to be the case.  So, recently, we decided to modify the door.

Camilo Castro got nominated for the job, so we began by removing the door from the hinges and carrying it down to the shop.  There, we removed the hinge pieces and ran the back of the door across the joiner a couple of times to reduce the width of the door.  Then we re-cut the hinge mortises with a chisel and re-installed the door hinge halves.
Camilo re-installing the door hinge half on the door

We decided to replace the door lock on the door, as well.  The original door lock is the type that remains locked from the outside at all times (typical on exterior doors in Colombia).  That was manageable when the door didn't close easily - for years now it has rubbed against the frame so it could remain mostly closed, but still able to be opened from the outside.  But since our goal was to make it shut easily and normally now, we needed to change the lock style to one that can be locked with the push of a button on the inside knob.

Camilo assembling the new lock on the door.
It actually took us a couple of tries to get the door cut down to the proper size, so Camilo got some good practice at the requisite skills of aligning and installing the hinge pins.


Camilo re-installing the door
We applied some stain and varnish to the newly cut edge of the door, so that it will be protected and looks the same as the rest of the door.  Now the door closes perfectly - smoothly - and no more need to slam it.

Camilo now satisfied with a job well done!

Thursday, September 1, 2011

Repairing two stools

Our ministry director, Nancy Centeno, arrived at the farm one day in July with a couple of mostly disassembled stools and requested that we fix them up for someone that will reimburse the ministry for the work.

Unfortunately, I wasn't on the ball enough to take a "before" shot, but here's a record of the work the kids did to re-assemble, reinforce, and re-finish them.

We started by gluing and re-assembling the structure of the stools.  It appeared the original manufacturer had used very little glue!  Next, we prepared some small corner reinforcements using similar hardwood to the stools, so they would blend in to the structure.

Anderson Mora preparing to attach corner reinforcements to strengthen the structure of the stools.

Then the boys sanded the entire structure of the stools to remove defects and get them ready for re-finishing.

Sebastian Avila using the palm sander -  with a stretch!

We applied several coats of sanding sealer to the new reinforcements, to bring the smoothness and shine of the wood up to match the original structure of the stools.

Alexander Garcia applying sanding sealer to the corner reinforcements.

Then more sanding..

Camilo Castro (left) and William Cruz (right) sanding after another coat of sealer.

 And more sealer,

Andres Castro mixing the sanding sealer.

and more sanding,
William Cruz smoothing the surface of the sanding sealer.


and finally a couple of coats of lacquer to finish the job.  We also re-stapled the cushions and re-attached them to the stools.  The result was quite nice, the stools look like new!


The refitted stools ready for delivery.  Good job, guys!