Wednesday, September 14, 2011

Fixing the front door - older boy's house

Due to settling during the last rainy season, the front door to the older boy's house got very tight in the frame, to the point that it only closed with great force or by slamming it.  I thought for a few months that the house foundation would eventually return to its former position, and that the problem would abate, but that proved not to be the case.  So, recently, we decided to modify the door.

Camilo Castro got nominated for the job, so we began by removing the door from the hinges and carrying it down to the shop.  There, we removed the hinge pieces and ran the back of the door across the joiner a couple of times to reduce the width of the door.  Then we re-cut the hinge mortises with a chisel and re-installed the door hinge halves.
Camilo re-installing the door hinge half on the door

We decided to replace the door lock on the door, as well.  The original door lock is the type that remains locked from the outside at all times (typical on exterior doors in Colombia).  That was manageable when the door didn't close easily - for years now it has rubbed against the frame so it could remain mostly closed, but still able to be opened from the outside.  But since our goal was to make it shut easily and normally now, we needed to change the lock style to one that can be locked with the push of a button on the inside knob.

Camilo assembling the new lock on the door.
It actually took us a couple of tries to get the door cut down to the proper size, so Camilo got some good practice at the requisite skills of aligning and installing the hinge pins.


Camilo re-installing the door
We applied some stain and varnish to the newly cut edge of the door, so that it will be protected and looks the same as the rest of the door.  Now the door closes perfectly - smoothly - and no more need to slam it.

Camilo now satisfied with a job well done!

Thursday, September 1, 2011

Repairing two stools

Our ministry director, Nancy Centeno, arrived at the farm one day in July with a couple of mostly disassembled stools and requested that we fix them up for someone that will reimburse the ministry for the work.

Unfortunately, I wasn't on the ball enough to take a "before" shot, but here's a record of the work the kids did to re-assemble, reinforce, and re-finish them.

We started by gluing and re-assembling the structure of the stools.  It appeared the original manufacturer had used very little glue!  Next, we prepared some small corner reinforcements using similar hardwood to the stools, so they would blend in to the structure.

Anderson Mora preparing to attach corner reinforcements to strengthen the structure of the stools.

Then the boys sanded the entire structure of the stools to remove defects and get them ready for re-finishing.

Sebastian Avila using the palm sander -  with a stretch!

We applied several coats of sanding sealer to the new reinforcements, to bring the smoothness and shine of the wood up to match the original structure of the stools.

Alexander Garcia applying sanding sealer to the corner reinforcements.

Then more sanding..

Camilo Castro (left) and William Cruz (right) sanding after another coat of sealer.

 And more sealer,

Andres Castro mixing the sanding sealer.

and more sanding,
William Cruz smoothing the surface of the sanding sealer.


and finally a couple of coats of lacquer to finish the job.  We also re-stapled the cushions and re-attached them to the stools.  The result was quite nice, the stools look like new!


The refitted stools ready for delivery.  Good job, guys!


Wednesday, August 31, 2011

Painting the BBQ

You may remember that we built a barbecue for the ministry back in mid-May.  We didn't have time to paint it before I left on my trip to the US, so now we're finally getting around to the effort.

The barbecue before painting.

The prep work for this project included finding high temperature paint for the job.  Many paint stores that I tried in Bogotá carry aerosol cans of this paint, but it is rather expensive in this form, about $12 per can.  So I dedicated most of a morning to go find high temp paint in bulk, and when I found it, bought a quart plus the special solvent for about $15.  Now I'll know where to go when and if we get around to building those wood stoves that I've been talking about for years....

The next piece of preparatory work involved removing the considerable amount of rust, scale, and grease that has built up on the barbecue over the past couple of months.  The boys started on this job using one of the 4-1/2" grinders fitted with a wire wheel, but we quickly found out that this was a job too risky for them to handle.  Camilo Castro, one of the older and stronger boys, hit an edge wrong with the grinder, such that he lost control of the grinder and it ended up stalled with the wire wheel wound up in his sweatshirt.  Fortunately, he wasn't hurt and I was able to disconnect the cord fairly quickly.  I thought the grinder had toasted the motor when it was stalled with the power still on, but after having it checked out at the local dealer, it was deemed still have another life left in it.

So the boys used wire brushes, putty knives, compressed air, and solvent to clean up the body and legs of the barbecue.  Then I finished the job using the grinder and wire wheel, but with care, and without incident.

After an afternoon of preparation, it was time to paint.  I sprayed the first coat because the boys were all busy with other duties that day.

The barbecue after the first coat of paint.
The high temperature paint requires an unusually long period of time between coats - 10 hours drying time.  So the next day, Andres Castro applied the second coat of paint:

Andres hadn't used the gun much before this job, so he learned a good deal about how to adjust the gun for each situation, and improved his technique dramatically.


We suspended the unit on some lengths of small angle iron for painting the underside, which meant Andres had to stand on a bench to reach the bottom of the supports.


Andres ended up with a few wrinkles and runs - but for his level of experience with the gun, he did very well.

Here's the proof, the finished BBQ, now situated in its own covered spot below the park structure at Granja Peniel, ready for the next time we need to grill some steaks....


Friday, August 12, 2011

Making signs around the farm

Here's a sign the staff put together one afternoon with bottle caps, marking the start of an environmental trail winding through the pasture lands at Granja Peniel
As a money-raising activity, the ministry has recently begun offering Granja Peniel as a field trip destination to schools in Bogota.  To help make their visits more educational, we needed some signs around the farm explaining the names of the various animals and facilities we have.

So, we found some scrap particle board sheets in the workshop that would fill the need for the time being, and cut them into practical sizes for signs.

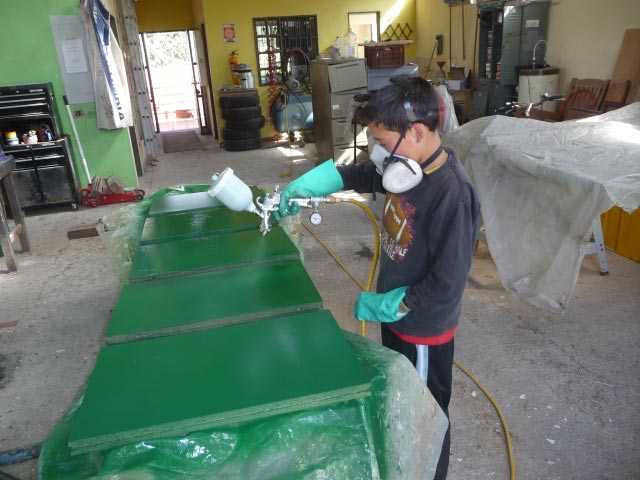
Then the boys got busy painting...Anderson Mora and Arley Rocha got the nod.

We decided a nice green background would look nice, it was the best color of paint we had on hand, too.

Arley Rocha giving the new signs a nice coat of paint

Anderson Mora applying a second coat.
 Most of the particle board had came from office dividers and furniture - and was equipped with plastic edge trim.  Thinking that this trim may help extend the life of the signs out in the rain, I found some more trim (cheap) in Bogota.  After the signs were painted,  we installed old or new trim on all the signs.

 Then we turned the signs over to Alejandra and Angie Guzman for the hard work - that is lettering!  They have the artist's touch and made the plain painted wood into functional signs.  I don't have photos of their efforts, but here are some shots of how the finished signs look.

Here's the sign on the greenhouse - huerta means garden in Spanish
And the sign on the rabbit shed
And a sign listing the different breeds of the cows at the corral
And last, but not least, the sign at the sheds where the goats spend their nights.
We do plan to make more permanent signs one day soon, probably gluing up some pine lumber that we have on hand - and using a router to make at least some of the lettering.  But the signs above that we put together in less than a week will do the job nicely in the meantime...

Thursday, July 28, 2011

Update - Greenhouse garden

After four months of operation, I thought it would be nice for you to see how well the garden in the greenhouse is performing.

Here are some shots taken inside the greenhouse on July 28th:

Even when it's chilly outside, it's warm and humid inside.

How's that for a nice cabbage!

The two daughters of the Guzman family, Alejandra and Angie, take care of the garden, with help from the boys.

Some areas of the garden have been replanted after harvest....


The carrots are taking over!
What a blessing the garden is to everyone at the farm, we are able to enjoy healthy vegetables grown organically, using the land and sunlight that the Lord has provided.  Praise Him!


Tuesday, July 26, 2011

Fixing bicycles

This is the first post after my trip to the US in May and June to visit my family.  Since my return in mid-June, it's taken a while to get back into the swing of things in the shop, due to illness (I caught an intestinal parasite in late June after my trip) and also to having to address maintenance issues around the farm.

The bicycles were needing maintenance, so Felix Pinzon, the care-giving father for the younger boys at the farm, suggested that we work with the boys on their bikes.  Here are a couple of illustrations of that effort...

Most of the repairs are pretty basic, like fixing flats and repairing brakes.

Felix Pinzon checking out the front tire with David.
But sometimes the problems are more difficult to resolve.

Esteban Zambrano removing the retainer on the bottom bracket of his bicycle, while Marlon Rocha (left) removes the front tire.

Grant holding the punch for Esteban.
 That afternoon, we completely rebuilt the bottom bracket for Esteban's bike, which came out great.  We felt a nice sense of accomplishment.  Then, on the road test, we found that his coaster hub assembly would slip under heavy pedal loading - and wouldn't brake well, either.  After two attempts at fixing the coaster hub, we gave up and set the bike aside to replace the hub.  Must be higher echelon maintenance!

Saturday, May 14, 2011

Building a barbecue

I've had the idea for a while now to take an old water heater tank and turn it into a barbecue for the farm.  We have never had a proper BBQ at the farm, instead using half a 55-gallon drum until it rusted out, with a rebar grid that had 10 cm between bars, not very handy to keep the meat out of the fire.

So, when the ministry scheduled a retreat for the last weekend in May, I offered that we could build a barbecue to be used at the retreat.  Since I was already teaching arc welding classes to the boys, it seemed like a natural project to fit into the classes.

I started the project myself, and then worked the boys into the project as time went along.

This is the water heater tank we started with.

I sliced it into three pieces using the oxy-actelyene cutting torch.

And welded two of the pieces together to form the pan for the BBQ.
Then added some legs and braces

And then got fancy with some air-injection pipes with control vavles
Up to this point, we'd used materials that were laying around the shop.  Then I had to buy some round bars to be able to make the upper grate for the meat and the lower grate to hold the fire off the bottom.

William Cruz welding the upper grate while Andres Castro observes.

Anderson Mora welding the lower grate.

Anderson (left), Andres (center), and William Cruz (right) showing off the results of their handiwork.
The BBQ was used very successfully both during the retreat and for many events since then.

I added later the following photo showing the BBQ in action at a luncheon held at a church in Bogotá for the benefit of the IMiC ministry:

The barbecue is working great!