Friday, August 12, 2011

Making signs around the farm

Here's a sign the staff put together one afternoon with bottle caps, marking the start of an environmental trail winding through the pasture lands at Granja Peniel
As a money-raising activity, the ministry has recently begun offering Granja Peniel as a field trip destination to schools in Bogota.  To help make their visits more educational, we needed some signs around the farm explaining the names of the various animals and facilities we have.

So, we found some scrap particle board sheets in the workshop that would fill the need for the time being, and cut them into practical sizes for signs.

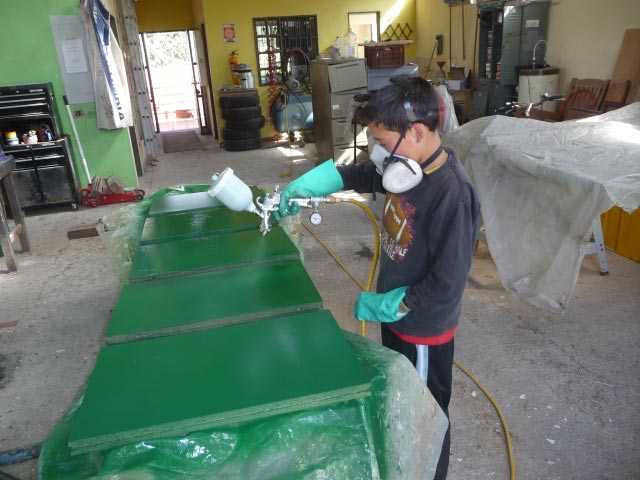
Then the boys got busy painting...Anderson Mora and Arley Rocha got the nod.

We decided a nice green background would look nice, it was the best color of paint we had on hand, too.

Arley Rocha giving the new signs a nice coat of paint

Anderson Mora applying a second coat.
 Most of the particle board had came from office dividers and furniture - and was equipped with plastic edge trim.  Thinking that this trim may help extend the life of the signs out in the rain, I found some more trim (cheap) in Bogota.  After the signs were painted,  we installed old or new trim on all the signs.

 Then we turned the signs over to Alejandra and Angie Guzman for the hard work - that is lettering!  They have the artist's touch and made the plain painted wood into functional signs.  I don't have photos of their efforts, but here are some shots of how the finished signs look.

Here's the sign on the greenhouse - huerta means garden in Spanish
And the sign on the rabbit shed
And a sign listing the different breeds of the cows at the corral
And last, but not least, the sign at the sheds where the goats spend their nights.
We do plan to make more permanent signs one day soon, probably gluing up some pine lumber that we have on hand - and using a router to make at least some of the lettering.  But the signs above that we put together in less than a week will do the job nicely in the meantime...

Thursday, July 28, 2011

Update - Greenhouse garden

After four months of operation, I thought it would be nice for you to see how well the garden in the greenhouse is performing.

Here are some shots taken inside the greenhouse on July 28th:

Even when it's chilly outside, it's warm and humid inside.

How's that for a nice cabbage!

The two daughters of the Guzman family, Alejandra and Angie, take care of the garden, with help from the boys.

Some areas of the garden have been replanted after harvest....


The carrots are taking over!
What a blessing the garden is to everyone at the farm, we are able to enjoy healthy vegetables grown organically, using the land and sunlight that the Lord has provided.  Praise Him!


Tuesday, July 26, 2011

Fixing bicycles

This is the first post after my trip to the US in May and June to visit my family.  Since my return in mid-June, it's taken a while to get back into the swing of things in the shop, due to illness (I caught an intestinal parasite in late June after my trip) and also to having to address maintenance issues around the farm.

The bicycles were needing maintenance, so Felix Pinzon, the care-giving father for the younger boys at the farm, suggested that we work with the boys on their bikes.  Here are a couple of illustrations of that effort...

Most of the repairs are pretty basic, like fixing flats and repairing brakes.

Felix Pinzon checking out the front tire with David.
But sometimes the problems are more difficult to resolve.

Esteban Zambrano removing the retainer on the bottom bracket of his bicycle, while Marlon Rocha (left) removes the front tire.

Grant holding the punch for Esteban.
 That afternoon, we completely rebuilt the bottom bracket for Esteban's bike, which came out great.  We felt a nice sense of accomplishment.  Then, on the road test, we found that his coaster hub assembly would slip under heavy pedal loading - and wouldn't brake well, either.  After two attempts at fixing the coaster hub, we gave up and set the bike aside to replace the hub.  Must be higher echelon maintenance!

Saturday, May 14, 2011

Building a barbecue

I've had the idea for a while now to take an old water heater tank and turn it into a barbecue for the farm.  We have never had a proper BBQ at the farm, instead using half a 55-gallon drum until it rusted out, with a rebar grid that had 10 cm between bars, not very handy to keep the meat out of the fire.

So, when the ministry scheduled a retreat for the last weekend in May, I offered that we could build a barbecue to be used at the retreat.  Since I was already teaching arc welding classes to the boys, it seemed like a natural project to fit into the classes.

I started the project myself, and then worked the boys into the project as time went along.

This is the water heater tank we started with.

I sliced it into three pieces using the oxy-actelyene cutting torch.

And welded two of the pieces together to form the pan for the BBQ.
Then added some legs and braces

And then got fancy with some air-injection pipes with control vavles
Up to this point, we'd used materials that were laying around the shop.  Then I had to buy some round bars to be able to make the upper grate for the meat and the lower grate to hold the fire off the bottom.

William Cruz welding the upper grate while Andres Castro observes.

Anderson Mora welding the lower grate.

Anderson (left), Andres (center), and William Cruz (right) showing off the results of their handiwork.
The BBQ was used very successfully both during the retreat and for many events since then.

I added later the following photo showing the BBQ in action at a luncheon held at a church in Bogotá for the benefit of the IMiC ministry:

The barbecue is working great!


Tuesday, May 10, 2011

School Project

William Gomez and Camilo Castro were assigned a project by their teacher at the public school to build a picture/pen holder from wood to be given to their mother for Mother's Day.  The project came with some specific dimensions and instructions which were duly noted by William and Camilo.  They came to me for help in completing the project.

They also had some discretion in the materials and methods used to build the picture/pen holder.  Camilo chose to build his from one larger solid piece of wood, and William chose to follow the teacher's suggestions for gluing together smaller blocks of wood.

The boys started by cutting out the smaller blocks for William's approach on the table saw.  They got to see the benefits of using a fingerboard and also clamping a block to the fence for making blocks all the same length.

Camilo Castro ripping a small board using a featherboard while William receives the other end.

William cutting the squared up board into blocks of equal length.
The boys got some help from Anderson Mora in sanding the pieces of their project:

Anderson Mora hand sanding the little blocks for William.

Unfortunately, I didn't take any more pictures of their work except the finished product from Camilo, as shown below:

Camilo's finished picture/pen holder.


Thursday, May 5, 2011

Arc Welding Classes

After finishing the greenhouse project at the end of March, I began to hold consistent classes with the older boys teaching them how to weld with the electric arc welder.

We started with classroom type instruction covering the electrical circuit and its measurements, the welding equipment, and of course welding safety.  We spent two, one-hour classes on these introductory topics.

Then I began allowing the boys to try their hand at striking an arc and making a bead.  I introduced them to the various types of welding electrodes (welding rod) and we how to select the best rod for the job.  They learned how to adjust the welding machine to the situation and the type of rod being used.

William Gomez welding with two other boys observing.
 They had the usual problems that beginning welders face, rods that stick to the work, difficulty holding an arc, moving the rod too fast to make a nice bead, etc., etc.  But they learned how to correct their technique and avoid these problems, too.


Fabian Perdomo (left) and Anderson Mora (right) checking out their practice beads. 
Anderson cleaning the slag from his bead.
Once their practice plate was full of welding beads on both side, they had to grind them flat to be able to continue practicing.  So the boys would take turns welding and grinding their plates.

William Cruz grinding his practice plate flat.

Most of the boys loved the hands-on nature of the work and conquering their fears of a process that is fiery and that can be scary.

After only 5 weeks of instruction, many of the boys were anxious to try their newly developed skills on a project, which you will see in the next post.


Thursday, April 14, 2011

Rabbit hutches

We wrote a few weeks back about building new apartments for the laying hens, and well, the rabbits also find themselves needing new quarters because of their expanding population.  We have five pregnant rabbit mothers who are needing a place to take proper care of their clutch.

So we got busy with the boys to prepare four new hutches to meet the demand.

Anderson Mora cutting 1/4" plywood to form the sides and end of the hutch.


Johan Egson Fonseca cutting the entrance hole for the hutch.


Arley Rocha, right, preparing the pieces for assembly while William Cruz, left, secures them with the pneumatic staple gun.
 

Sebastian Avila uses screws and a drill to assemble the hutch.
The finished hutches before they left the shop. 


Fortunately, when the baby rabbits were born, their mothers had new hutches to protect them in, so they all survived just fine.